Sunday, February 28, 2010

Router Table: Part 3


So, this is about where I left off last time, yes? The jig is built, the melamine top is screwed into place, in perfect alignment so the jig will guide my router bit to cut out the exact shape I want in the exact location I want it. The reason we build jigs is to make a job easy, controllable and, if needed, repeatable. And this jig meets the first two requirements.

Excellent!

The next thing to do is to place the router on the melamine top and start routing. As you can see here the router rides perfectly level because the center piece of the jig has a melamine top of it's own made of scrap pieces left over from the construction of the real top.

Here is the piece with part of the routing done. I started a little north of the lower right corner, moving clockwise, against the rotation of the bit so I can control the movement of the router. If you move with the rotation of the bit ("Climb Routing") the router can get away from you and accidents can result. There is a time and place for that technique, but this ain't it.

My wife, Debra, was kind enough to take this shot of me during the routing procedure. As you can see I am wearing all the proper safety gear, including safety glasses, respirator and ear plugs.


Here the work is nearly finished. One thing about hardboard, melamine coated or not; it may be a tiny bit brittle and very heavy to work with, but at least it produces mountains of nasty dust when you cut it! It is a remarkably versatile product when used properly, though.

So here it is with the dust vacuumed off. It looks a little better this way, yes?


Next time: I'll size the top and begin the process of mounting it to the substrate.

Router Table: Part 2


Things are shaping up nicely! I have the top nearly finished as of this writing. I'll begin taking you through the steps up to this point. I'm going to do this in small, digestible chunks for those of you who are not woodworkers. For the sawdust lovers who are reading this, please be patient... I'll get to the details you want soon enough.

Here is the material I'm using for my top. It's 1/8" melamine coated hardboard laminated to regular 1/8" hardboard. The opening for the router plate has been rough cut (VERY rough cut... I hate my jigsaw), and two points have been located and drilled out so that it can be mounted to the jig I used to rout out the opening to it's finished dimensions. The same points will be used to mount it to the substrate of the router table itself when the time comes.

Here you can see the finished jig. The two points I have circled with pencil line up with the two drilled points on the melamine top. When screwed down the top lines up perfectly with the jig so that the opening I cut matches the opening I have already drawn onto the top. The melamine surface mounted in the center of the jig serves only to to keep the router base level so the sides of the opening will be at right angles to the top. It also makes the job a lot easier because there is no chance of the router suddenly tipping to the side during a lapse of concentration on my part.

Here is the top screwed onto the jig, ready for routing. You can see the size of the whole thing as compared to my small level, which is one foot long.


And here is the router with a bearing guided bit chucked in it. The bearing rides on the inside edge of the jig I built while the cutters slice off the melamine. The bearing and the jig keep the cutters from removing too much material and the result is an opening that is perfectly sized to fit my router plate.

Next time: I'll actually turn on the router and get to the fun part!

Friday, February 26, 2010

Router Table: Part 1


This is the substrate for my new router table. It consists of a layer of 3/4 Birch Plywood on bottom and 3/4 Medium Density Fibreboard (MDF) on top. It is stiff and flat, two things one really needs in a router table. The whole thing will be topped off with the big white sheet you see in the upper portion of this photo, and I'll explain that in a minute.

You can see the outline of my router plate traced onto the surface with a hole cut into the center to accept the router itself. I cut the hole with my jig saw. I own the worst jig saw in the long and storied history of power tools, by the way. I think I shall recycle it as a paper weight at the first available opportunity.

The actual surface of my router table will be made of 1/8" Melamine hardboard, which you can see in the first photo. I have laminated a sheet of 1/8" hardboard and a sheet of 1/8" melamine hardboard together because the glue line binding the two creates a stiffer product than 1/4" melamine hardboard alone. However, I still have to add a very thin layer of... something I have yet to identify, in order to raise the melamine to dead-level with the surface of the router plate. Or I can cut down the surface of the MDF under the plate so the plate will drop down to be level with the Melamine. I'll do with this what I do with most of my projects: I'll figure it out as I go along.

This is the jig I built to guide my router when I cut the hole in the melamine for the router plate. The glue is still drying in this photo, which accounts for all the clamps. The melamine will be mounted on top with the hole already rough-cut into it, then the router, fitted with a straight bit with a bearing on the bottom will be guided by the jig from underneath.

Thursday, February 25, 2010

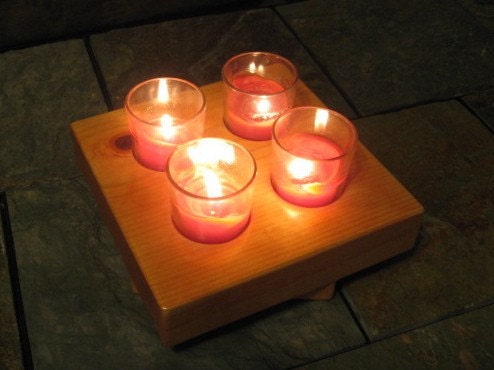
Distressed Pine Candle Holder, Honey Brown


This Distressed Pine Candle Holder is a beautiful addition to any home. It's made of pine, scuffed, stained and gorgeous. It holds 4 candles and looks wonderful on a coffee table, dining table, or in your master suite.

I have a second unit for sale just like this one, so it will be easy to get a pair of them for your home.

Scented candles to fit these, and most of my other candle holders, are available from Candles by Laura, another fine Etsy seller.

•••••

I am participating in the I Made It Blog Party at Everything Etsy. Go check it out!

I Made It Blog Party

• • • • •


If you make Handmade Home Decor Items, come and join our team by clicking on the image below. Not only will you be able to network with us, but also you will have the ability to post your listing on our team website.

Monday, February 22, 2010

A Star is Born


My son asked me to build a five pointed star for some school group he's in. It needed to be pretty big, but not so tall that he would have trouble moving it through classroom doors. We ended up with a 5' 8" star.

There was actually a mistake in the original design. Somehow I ended up with an angle of 124º on the sides of the five "kites" that join to create the star you see here. That really didn't work very well. After dry-fitting four points together the fifth one wouldn't fit. In a hurry, I sent an e-mail to my best friend, Patrick Underwood, asking him what the proper angle was. He got back to me in an equal hurry, telling me it should be 126º. I recut the pieces and, with a tiny bit of trimming, everything fit perfectly.

They will be painting this star once it gets to school, so I was done with it as soon as I finished filling and sanding it. It wouldn't do to send it to school only to hear that the kids got splinters when handling it.

Saturday, February 20, 2010

Honey Mesquite Candle Holders


Here are a pair of very cool candle holders made from one of my favorite woods, Honey Mesquite. The lines are simple, letting the natural beauty of this stunning hardwood shine through.

The color is red-brown, rustic, with darker markings and golden highlights. It changes with the changing lighting conditions.

This is a dense, heavy wood. It is durable, able to stand up to repeated, continuous use. The grain is course, but it has been refined, tamed for use in the most romantic of settings.

This pair will be equally at home in the dining room, den, or in your master suite. One pair of candles is included with your purchase from my Etsy shop.

And while you're looking at the Honey Mesquite Candle Holders, check out the rest of my candle holders, wine rests and bookends at my Etsy shop, and at my 1000Markets shop.


I Made It! – Blog Party at Everything Etsy (and Giveaway!)


I'll be participating in the I Made It! Blog Party at Everything Etsy this Thursday, February 25, 2010. Drop by and see what I'm promoting this week, and what the other participants have in store for you.

Tuesday, February 16, 2010

Clamp Rack


I installed this small project today. I had some time to kill, and I needed a place for my large clamps. I used to hang them from a rafter near the back of the building, but since I installed the assembly table my head will be occupying some of that space whenever I use my drill press. I was hanging them on my lumber rack for the past week or so, but that can't continue forever.

So I built this. It took about 20 minutes to put it together. I built it out of 2x4s and 3/4 plywood, with 2 inch deck screws holding it all together. It's not very big, but it doesn't have to be. I don't own that many large clamps because most of my projects are small. This holds all of my current collection and gives me plenty of room to grow.

My smaller clamps now hang from the afore mentioned rafter. I'm not tall enough to bump into those. Now I just need a lot more clamps.

Monday, February 15, 2010

Cleaned Up the Woodshop


Alrighty!!! I have pretty much put everything in it's place in the woodshop. And for the first time in months my bench is clear of all clutter and ready for me to start a brand-spankin'-new project.

That new project will be a big five pointed star for my son's school. 6 feet tall. Plywood. And I should have already started it but I need a couple of bits of information first, so I'll begin building it later this week. I still don't really know what it will be used for, but they need it, he wants me to build it, and that's enough for me.

And then I'll build my router table! I've been waiting for this for about a year! I just can't wait to get moving on it.

You can see in these photos how the new assembly table is the same height as the bench. It's also the same height as the table saw. This allows me to use both the bench and the assembly table as out-feed support for long pieces or sheet goods. In many cases I'll still need a roller stand or two between the table saw and the tables, but the added support the tables can provide is a nearly priceless addition to my shop.

I've had a great time putting all these pieces in place, and I'm going to enjoy the building process on the router table as well. After that, it's time to put all this equipment to good use. My Design Style Guide teammates are probably thinking I have given up building new candle holders and wine rests. In reality I'm just gearing up to add some major twists to my designs.


Sunday, February 14, 2010

Workshop Upgrades


I have added a set of cubby-holes to store my screws, nuts, bolts, earplugs, etc. And I added some dowels to hold small clamps and a strip along the bottom to hold spring clamps.

This, along with the shelves under the new assembly table, clears up vast amounts of space for storage. I've been cramped into this building for close to two years, but I always knew I could make more room by building the new table. Ironic, really, since the assembly table is the largest single item in my shop.

As shown before, the arm that holds the vacuum hose for my drill press has been moved. And I upgraded it with two new handles to make adjusting it easier. I thought about putting on the side of the press opposite the work light, but when I had it that way before I had obstacles on both sides of my work piece. This way I can simply place the flexible tube around the light so I can see clearly, and the right side of my work piece is open. Problem solved! And the arm can lift out of the way if needed.


Sunday, February 7, 2010

Assembly Table: Mostly Finished


I still don't have the drawers built, and lots of tools still need to be reorganized, but here you can see the table with much of the clutter removed.

The chamfered edge has been sanded, and I'll apply a coat or two of polyurethane in the very near future. The poly will protect the surface and make everything just a bit slippery so it will be easy to move projects around as need. I could easily wax the surface if I wanted to make it slicker still, but I don't.

I have also moved the drill press arm from it's old, temporary location to this new spot, mounted high above the drill press itself. A higher mounting point means more stability as the arm will be used in a more vertical manner than before. This is how I designed it in the first place, knowing it would eventually live in this new location. the thing is mostly made of 1/2 inch plywood so it can flex a bit if needed. It works best when it doesn't have to support much of it's own weight at the same time.

Here you can see the arm from the side. It has a shoulder, elbow, wrist and hand to hold the vacuum hose in place. I used it about an hour after this photo was taken and it worked great with no adjustments during the operation. I always had to fiddle with it during use in the old location.

Now I must clean up a bit more, then start building the big star for Trevor's school group. After that I have a couple of things I need to do for my online marketing team, Design Style Guide. I'll be participating in the Easter Give-A-Way, and I think I'm going to build something specifically for that event.

When I'm done with those things I'll start building my router table. It will replace the right extension wing on my table saw. I've been itching to start this for the last few months.

Wednesday, February 3, 2010

Assembly Table: More Progress


I've managed to clear out a lot more space in my shop and I haven't even rearranged the tools yet. I built this lumber storage rack yesterday and got a lot of sheet goods stored underneath it. The rack system I had before was mostly useless. This is all to help with the secondary function of the assembly table, which is to get all the clutter out of my shop. When the drawers are finished I'll be able to store all of my tools and keep my work surfaces clear of obstructions.

I have routed the chamfer onto the edge of my new table. I'll sand it and wipe on a coat or two of polyurethane to protect it and make it a bit more slippery.

Tomorrow I'll get a little more done on this project, then put it aside and start working on a five-pointed star for my son. He needs a star that six feet tall. I'm led to believe this has something to do with school. I'm building it out of plywood, trying to keep it light enough so it can be moved around the school, and short enough so it will fit through the doors there.


Tuesday, February 2, 2010

Assembly Table Continues


I now have a top on the table. I used 3/4 birch plywood for the top.

The shelves are 11/64 inch plywood. The lower shelves are reenforced with 2x4 material spanning the space underneath, while the upper shelves are reenforced with 3/4 birch ply under the front and back, and from above on the sides, where the supports also serve as low sidewalls to keep things where they are intended to be kept.

I finally have a permanent home for my drill press. I'll move the support arm for the vacuum attachment in a day or two, and I'll be done with that. I'll also be routing a slight chamfer onto the edge of the table this week. The table sits at the same height as my table saw, so the chamfer will be of some benefit when I'm ripping long stock and need to use the table as outfeed support.

The first thing I'll be doing tomorrow is cleaning up and moving a few things out of my shop... like the display unit that looks like a ladder. Those weathered boards standing up on the table top are the shelves that bridge the rungs of the ladder. These pieces will have a very nice, comfortable home right next door in our cozy little storage building.

Next I'll build the drawers in the center section, but I'll have to wait a while to get started because I have a couple of other projects which must be completed first.